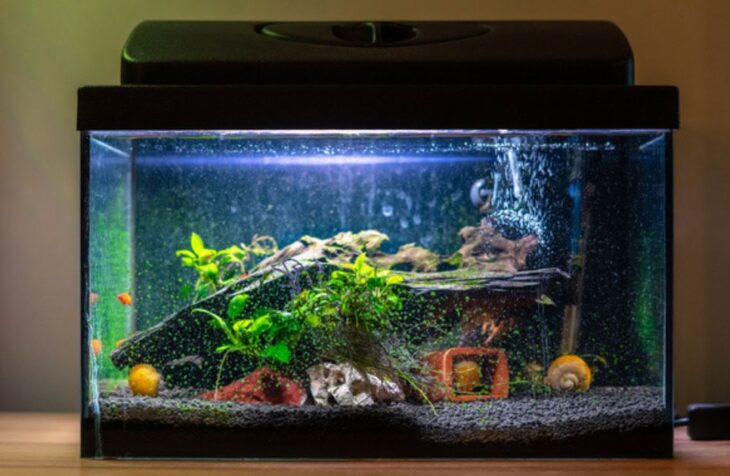
How to Care for House Plants That Grow Underwater
There is a distinct difference between a “planted aquarium” and an “aquarium with plants.”
Unlike a traditional aquarium, live plants are the primary focus. Fish being an accent or compliment to the effect in a planted aquarium.
Many new hobbyists transition from keeping freshwater fish to a planted aquarium. It gets often inspired by the fantastic planted aquarium images available. And the aim is to keep live plants that look more impressive than plastic plants. And keep the aquarium healthier.
Indeed, live plants benefit the aquarium by providing more natural refuges (and even food) for fish. And oxygenating the water by day. Absorbing excess nutrients. And releasing allelochemical defenses that may, to some extent, control algae.
Understanding Your Tank’s Characteristics
Before you start gardening, you need to understand your tank’s limits. And the effect of its physical and chemical parameters, lighting. And livestock on a given plant species and aquascape.
- Basic Water Chemistry
As with any healthy tank, you must start with an adequately cycled. And established aquarium with ammonia and nitrite reading of 0 ppm and nitrates at 40 ppm or less. Ideally, around 20 ppm.
- pH
A stable pH is also essential for the health of your tank and most tropical fish and plants.
Buying fish suited to your local water conditions gets advised over using pH-altering chemicals. These can sometimes be stressful for both plants and fish.
Some have limited capacity to remain stable in a given tank. Mainly low buffering capacity. Additionally, mixing your water to the exact pH at every change can be tricky. It can cause your pH to fluctuate.
A stable pH is more desirable than a fluctuating one. And while some fish and plants will adapt to something at the limits of their natural range, selecting fish and plants already suited to your current water is better.
- Hardness
Water hardness is also significant in the planted aquarium. It is vital to the health of both fish and plants. Though most new fishkeepers often ignore this parameter. Water hardness comes in two forms, general hardness (GH) and carbonate hardness (KH). Which get measured in parts per million (ppm) or degrees (dGH or dKH).
GH is the total dissolved salts in the tank. Carbonate, chloride, and sulfate salts. Salts are an essential component of freshwater. They are a source of calcium, magnesium, potassium, and other trace elements for fish and plants. They also affect the osmoregulation process in fish.
This is the maintenance of the internal to external salt/water balance). A dissolved salt content above or below the tolerance of a specific species can cause great stress. Thus, it is essential to maintain GH at an appropriate level by adding specially formulated aquarium salts. Not sodium chloride. Or regular table salt to increase hardness. Or by diluting hard water with soft water or RO (reverse osmosis) water to decrease it.
KH is a measure of dissolved carbonate and bicarbonate salts only. Understanding KH is especially important in planted tanks. Carbonates help a tank resist swings in pH and are commonly known as pH buffers. In planted tanks, plants photosynthesize daily. And consume CO2, dissolved in water as carbonic acid. The consumption of this acid can cause the pH to rise (i.e., the water will become more basic). At night, plants respire as animals do.
And along with the livestock and bacteria, it will add CO2, thus more carbonic acid, back to the system. This will lower the pH (i.e., the water will become more acidic). These swings in pH can harm fish and invertebrates. Increasing their susceptibility to disease over time.
To buffer the swing, a carbonate acts by excess binding acid in the form of hydrogen ions to create bicarbonate.
The reverse occurs at a more alkaline pH. It is to produce a carbonate compound. And release hydrogen ions and CO2 back into the water. Creating carbonic acid that once again lowers the pH.
Plants can also consume the CO2 released in this reaction. Carbonates are also a carbon source for plants when average dissolved CO2 and carbonic acid are low or absent.
When KH, and therefore carbonate levels, is very low, usually below three dKH or about 50 ppm, and all available CO2 in the water gets used up by plant growth, carbonates will get rapidly used up. And the buffering capacity will vanish. Without any buffering ability, plant cycles can now cause dangerous pH fluctuations.
All this means is that it is essential in low-tech planted tanks to measure your GH and KH. And ensure that both get kept above 3 degrees or about 50 ppm. A level of 4 to 6 dGH and dKH, or about 70 to 100 ppm, is ideal for plants and most tropical fish. Excluding brackish fish and African cichlids.
To raise your KH naturally, you can add a little calcium carbonate or sodium bicarbonate to your water. Ensuring it gets dissolved first. Calcium carbonate gets preferred, as calcium is a helpful supplement for fish.
Do note that adding bicarbonates may affect your pH by making it slightly more alkaline. So monitor this parameter in your tank. And in any replacement water, ensure that your pH stays constant for the health of your fish and plants.
- Substrate
Many newcomers use an inert and non-nutritive substrate. They are such as gravel, pebbles, rubble, or sand in their tank. The type used will affect what you can and cannot plant—or whether you can plant in the substrate. Again, a key point is grain size.
A gravel larger than 5 mm in diameter may cause problems. With poor rooting of some plants. Gaps may be too wide for roots to anchor correctly and let nutrients from mulm or fertilizer tablets dissolve out and away into the central water column.
Conversely, small-grained substrates like sand will likely compact too tightly for roots to penetrate deeply. Deep sand beds may also cause anaerobic zones. It is where there is no oxygen, and the flow of water and dissolved nutrients cannot penetrate well.
While some anaerobic zones can be beneficial for reducing nitrate into nitrogen gas by anaerobic bacteria, these areas may halt proper root growth if you choose to plant near them. The ideal grain size for a planted aquarium is about 2 to 5 mm.
Plant any stem plants if your substrate is within a suitable grain size. Make a small hole with your fingertip, plant, and backfill with the substrate. Bury the plant about an inch below where the roots emerge. And gently pull the plant upward to the right level after backfilling. This will let the roots orient themselves a little better.
For any rooted plant, let mulm accumulate around the base. This will break down and act as a natural fertilizer. Though if the plant is large and a heavy root feeder, such as a sword plant, a root tab is ideal to bury next to it to get it going. From there, accumulated mulm will generally do the rest. Still, utilize fertilizer balls/tabs if plants show signs of deficiency.
Aquarium Space and Livestock:
Naturally, the choice of hardscape and plants for a narrow and tall tank full of peaceful tropical tetras will vary. From one that is half the height, 6 feet long, and full of boisterous cichlids. Again, much comes down to research. Choose plants that grow to a good size for the tank. Those that will not overcrowd it and are compatible with your livestock.
Larger fish, active fish, and those that dig may restrict your choices to strong plants that cannot get uprooted. These include Anubias, Bolbitis, Java fern, well-tied mosses, or potted swords. Smaller tanks will also get restricted.
A little 5-gallon tank will look lush with various crypts, dwarf Sagittaria, pearl weed, and mosses. Still, you’ll find that large swords, tall stem plants like ambulia, Vallisneria, and various hygros will soon overrun them. And get bent out of shape in such shallow water.
- Lighting
A lot has got written about lighting for planted tanks. A complex topic. But success can get achieved in a simple setup with a basic understanding of the critical aspects.
There are two critical components to aquarium lighting. The first is the output, measured in lumens. This is the amount of light energy reaching an area.
And while few light bulbs note the lumens, you can assume in the case of your standard fluorescent bulb that more watts mean more lumens. Do note, though, that more efficient bulbs like compact fluorescent lights and T5s produce more lumens per watt than the older T12s and T8s, and LEDs are even more efficient.
The second is the color spectrum it emits. And the intensity of photosynthetically active radiation (PAR). Essentially, PAR means radiation or energy with the correct wavelength that plants can use. Happily, most aquarists need not be too concerned with these details, as most hardy plants requiring low to medium lighting will perform well under the light fixture setup provided with your tank when used with bulbs rated for plants. Still, it pays to know why, so let’s explore more.
- Light Intensity and Output:
Regarding light intensity and output, the more light output gets required. With more extensive and deeper tanks, as lumens decrease with distance and some light wavelengths, plants require do not penetrate water and others.
If you have a giant aquarium, chances are your accompanying light fixture contains long bulbs and probably a couple of them. Together, this will keep the length of the tank well-lit with intensity high enough for your plants.
If your tank came without lights, buy a fixture suited for your tank, and if you have an option, get the institution with room for more bulbs (better to have more than less).
For example, a 3- to 4-foot tank or more significant will require two to four bulbs overhead, though you can get by with less if you choose to use only lower light and floating plants, which will linger near the surface.
On the other hand, the excellent single fluorescent tube fertilizer will likely work well for an average 2-foot tank or less for smaller tanks, as they are more shallow.
If you need to boost your lighting intensity, purchase bulbs with a higher wattage, but if you want or need more bulbs and your fixture will not accommodate them, another tip is to purchase a strip of high-intensity (and proper spectrum) LED lights. The benefit of LEDs is that they produce more lumens for lower wattage and will save on power consumption.
For standard fluorescent bulbs, the typical rule of thumb is to aim for 2 to 4 watts per gallon, and this is generally not a bad rule to follow if you are working with standard fluorescent bulbs and low- to medium-light plants.
However, I find this often misleading, as a lower output will still serve well in smaller tanks that are considerably more shallow, and even a high output will fail your plants if the spectrum is incorrect.
- Spectrum:
Visible light contains energy in many wavelengths, producing different colors. These range from light on the red end of the spectrum to violet. White light is a combination of them all.
Plants absorb light for photosynthesis primarily in the red and blue areas of the spectrum and reflect wavelengths they do not use, chiefly greens. Therefore, bulbs with low intensity in these wavelengths will fail to grow good plants despite their brightness.
Luckily, most aquarium bulbs now have a chart on the side of the packaging showing the amount of light of each wavelength that the bulb produces. Those with large spikes in the area of 430 nm to 460 nm (blue spectrum) and 645 nm to 665 nm (red spectrum) will provide the right colors to grow your plants well, and another spike in the 500- to 600-nm region (yellow/green spectrum) will produce a nice daytime effect in your aquarium.
- Photoperiod
The final all-important factor in lighting is the photoperiod or the length of time per day the lights get left on.
To encourage healthy plants and prevent algae growth, a total period of eight to ten hours with an uninterrupted dark period of 12 hours gets recommended. It is also best to keep this period regular.
Some plants like crypts will melt with significant rapid variations in photoperiod, so a timer gets strongly advised to keep things constant.
For those working during the day, it is certainly also an option to split the photoperiod into two lighting blocks (even or uneven) so you can enjoy your tanks in the morning and at night when you are home.
A partnership should be three to four hours long to allow plants to gear up for photosynthesis and have some time going flat out.
- Fertilizer Requirements.
Fertilizer requirements depend on your growing, how fast plants are growing, and your stocking level.
For example, the need for additional fertilizers is probably nil in a lightly planted tank with several fish, good feeding, and hardy, slow-growing plants.
Large, root-heavy feeders (such as Amazon swords) may help add fertilizer balls or root tabs to the substrate.
On the other hand, if you have filled your tank with plants that grow fast, have some aerial roots, are epiphytic (plants that attach to surfaces and get not planted) or float, and your stocking is light to moderate, then liquid or powdered fertilizers may be of assistance.
Every aquarium is unique, so it is advisable to watch your plants over the first month or two and look for signs of deficiency. Generally, this will be nitrogen, iron, potassium, or trace element deficiency.
In addition, symptoms of fertilizer such as slow growth, thin, spindly leaves, stems, yellowing leaves, pale veins, etc., will indicate that a supplement is required.
While many recipes for dosing nutrients, a liquid fertilizer made by a reputable company will perform well for most basic setups with hardy plants.
When selecting an excellent liquid fertilizer, look for a supplement with trace elements such as iron, manganese, boron, zinc, etc., and one that has a good ratio of nitrogen (N), phosphorus (P), and potassium (K), otherwise known as the NPK ratio. Ideally, a percentage of N with one to two times the K and minimal or zero P is advisable. Plants require P, but excess can lead to algal blooms, and there is usually good P in the aquarium from fish waste and fish food to fulfill the requirements of most plants.
Plants use nutrients continuously, just like CO2, and a regular serving of liquid fertilizer will benefit most tanks. Dosing can get done daily, though every few days or once a week will suffice.
Due to water evaporation, some fertilizers not used elements can build up over time, so regular moderate water changes (20 to 40 percent weekly or every other week) get advised when using fertilizers to prevent any dangerous nutrient accumulation.
Frequent water changes also replenish other elements, such as dissolved minerals (calcium, magnesium) and carbonate salts, necessary for fish.
Now that you know the basics necessary to set up a planted aquarium, you might wonder about aquascaping the tank. Next month, I will offer aquascaping tips, a selection of appropriate plants for beginners, a how-to guide for placing hardscape items, and more to make your tank look as good as a pro’s.
Beginner-friendly Live Plants
- Cryptocoryne wendtii
It is a small plant. However, the great thing about this plant is that it can grow on any substrate.
Also, it can thrive in almost any lighting condition.
- Marimo Moss ball
It is just a tiny green ball. It is a kind of algae, but it looks good in the Tank.
The significant part about this is that it doesn’t require any maintenance and can survive in any lighting condition.
Also, they are very cheap.
You just have to toss it in your aquarium, and then whenever you change the water, just move this ball a little bit so that the part at the bottom will also get light or die.
It is an excellent plant to put in the Goldfish tank because Goldfish will move it around and nibble on it.
- Aponogeton Crispus
It is also a very cheap plant.
It is a fast-growing plant ideal for fish who like to nibble on plants.
These plants don’t require any maintenance. You just have to put them on the substrate and grow independently.
- Java Moss
It is another low-maintenance plant, but it is a bit expensive.
This plant grows relatively fast and is perfect for Goldfish because sometimes they can nibble on it.
This plant is also perfect for breeding fish.
- Susswassertang
It is probably the most beginner-friendly plant on this list.
You don’t have to tie it to any ornament or substrate.
You just have to put it into your aquarium, which can survive in any condition.
It is probably not the easy to find plant, and it is also not the cheapest.
- Amazon sword
It is probably one of the most popular plants in this hobby.
This plant grows very big and requires a deep substrate for proper growth.
This plant can survive in low to moderate lighting conditions.
You should use some fertilizers for their fast growth.
As it is a fast-growing plant and grows massive, it is ideal for fish who like to eat plants because they will consume them entirely.
Maintaining a Planted Aquarium
You have your substrate laid down, plants in the medium, water topped off and warmed, fish happy and swimming.
How do we ensure our planted fish tank continues to thrive and prosper?
We must pay close attention to water chemistry, nutrient intake, and plant maintenance to ensure everything stays lush and green.
- Substrate Turnover
Remember that your substrate will mix over time using different grain sizes. For example, a mix of sand and gravel will eventually become a layer of gravel on top of the sand.
Most people use a siphon hose to gently probe and remove fish waste, uneaten food, and other material during a water change. In the planted aquarium, we still do this, only less so.
Some aquarists stick to only taking water from the top and not touching the substrate! It is recommended only for fully mature setups, by the way.
The substrate is an essential component of the planted ecosystem, and it can’t overemphasize how careful we want to be about messing with it. It’s where plants eat, water is filtered, toxins get broken down, and life thrives.
But until our beneficial bacteria and plants mature, we want to gently turn over the substrate to ensure material mixes and plant roots are undisturbed.
Gently turning your substrate during a water change is the best way to ensure a healthy, attractive mix and keep anoxic areas from forming.
Anoxic pockets are spots where no oxygen flow reaches.
Anaerobic bacteria (those that don’t require O2) can thrive and create toxic byproducts that leach into your ecosystem. The keyword here is “gently,” by the way, to avoid damaging sensitive root systems.
- Algae Growth
Algae is a constant enemy to aquarists, especially in newly planted tanks.
It is because there are abundant light and free-floating nutrients, but the new plants and beneficial bacteria cannot take it up yet.
Algae are single-celled plants that can quickly divide and soak up the available nutrients and form ugly green coatings on any surface.
Algicides like API Algaefix are excellent, if sometimes temporary, to keep algae under control.
If you have a localized algae infection, like a patch of blue-green algae (cyanobacteria) on the substrate, hitting it with a dose of hydrogen peroxide is a great tactical nuclear option that won’t cause much harm to the rest of your ecosystem.
Algae eaters are an excellent biological control method for green algae.
Dwarf algae eaters, as mentioned earlier, are model citizens for the planted tank, working hard to keep glass and leaves clear of algae.
Amano shrimp are easier to find nowadays as well! These tiny shrimp prefer to live in groups of 6 or more and will work tirelessly at picking leaves clean of algae. Remember to avoid angelfish and other nippy fish who will see them as food!
- Carbon Dioxide Supplements
Carbon Dioxide (CO2) supplementation is one of the best things you can do for your planted fish tank.
While it can sometimes involve additional equipment, this, combined with a rich substrate and intense lighting, is like rocket fuel for plant growth (and algae – careful!).
You have the following choices for supplementing your planted aquarium with CO2:
CO2 Tablets
Supplements like ISTA CO2 tablets are one of the easiest and least expensive ways to boost plant growth. Simply drop them in and watch them fizz!
One problem with these is that the boost is extremely temporary because most of the fizzy CO2 bubbles rise to the water’s surface and dissipate into the air!
One way to get the most CO2 for your dollar is to place a small plastic cup or other concave surface over the tablet.
As it fizzes, a bubble of CO2 will collect underneath and slowly dissolve additional CO2 into the water over time.
CO2 Reactor/Diffuser
These are a bit more complicated and not recommended for your first planted tank.
These include diffusers that hook up to pressurized canisters of CO2 you can buy for a short boost of super tiny bubbles and other methods like liquid CO2 injectors.
Ongoing Maintenance Schedule
- Daily Check
- Nutrients
Many manufacturers suggest dosing liquid plant nutrients weekly but splitting the weekly dose into smaller amounts and dosing daily or every other day ensures optimum plant growth and vibrance.
- CO₂
Dose liquid carbon supplements daily, preferably just before the lights come on. If you use a manual CO₂ injection system, open the regulator valve to start the flow of CO₂.
Do this about an hour before the tank light comes on, and make sure the diffuser is functioning.
Close the valve about an hour before the light goes off. If you use static diffuser chambers, fill them about an hour before the lights come on to ensure an adequate supply of carbon when your plants start photosynthesizing.
If you use an automated system, ensure the solenoid and diffuser function correctly.
- Lighting
Ensure your lighting timer is set correctly, and turn your lights on and off at the proper time.
- Top-off
Add reverse osmosis or deionized water to compensate for evaporation. (This is necessary for those who do not have a cover on the tank.)
- Weekly Maintenance
- Water Tests
Check water temperature and test for pH, hardness, nitrate, and phosphate. Add filter media or increase water changes if nitrate or phosphate levels rise.
Many dedicated planted tank enthusiasts also test for iron (Fe). And adjust the dosing of liquid plant supplements to maintain proper levels.
- Algae Removal
Scrape inside glass and remove algae from the hardscape with a small brush.
Clean Glass Cover – If you have a cover on your tank, keep it spotlessly clean. This is to ensure proper light penetration.
- Water Exchange
Change 10% to 25% of the water every week. Siphon plant debris off the bottom. But avoid vacuuming too deep into the substrate. This may disturb plant roots or solid nutrient materials you may have installed.
- CO₂
Check your CO₂ cylinder pressure gauge for fill level and replace the bottle as needed. If your regulator does not have a fill gauge, make sure you have a spare CO₂ bottle on hand, especially if you’re nearing the end of its typical lifespan.
Grooming plants is therapeutic and possibly the most rewarding part of owning a planted aquarium.
Trim out dead or dying plant leaves on Anubias, Swordplants, Cryptocoryne and other broadleaf plants.
Cut and replant the bunch of plants getting too tall or starting to drop their lower leaves. (This is normal and must get done regularly.) Lower stems rooted in the gravel can get discarded or grow new branches.
Trim mosses, baby tears, and other groundcover plants with scissors.
Harvest surface plants like duckweed, hornwort, Salvinia, and Phyllanthus as needed to ensure light penetration to the plants below.
- Nutrients
Dose liquid plant nutrients and check your supply to ensure you don’t run out.
- Health Check
Check plant leaves for damage, signs of distress, or nutrient deficiency. It can get seen as yellowing or holes in the leaves. Inspect your fish for signs of stress, injury, or disease.
- Filter
Check your filter’s flow rate. Rinse or replace the cartridge or mechanical filter media if it has slowed. Add or replace chemical media if nitrate or phosphate levels are rising.
- Monthly Maintenance
Perform all your regular weekly maintenance tasks. But here are some extra things you can do once per month:
- CO₂
Soak the ceramic diffuser in vinegar or replace it as needed to ensure a reasonable CO₂ flow rate.
Nutrients
If you use plant nutrient tablets, replenish them every 4 to 6 weeks.
- Groom Plants
Reposition, thin out, or remove large or fast-growing plants. They are going to overshadow or crowd out smaller or slower-growing species.
- Add Plants or Fish
You’ve worked hard. Indulge yourself! Take a trip to your local aquarium store and treat yourself to some new plants or that fish you’ve been thinking of adding. Don’t forget to pick up some fertilizer or check out those cool pruning tools you’ve been eyeing!