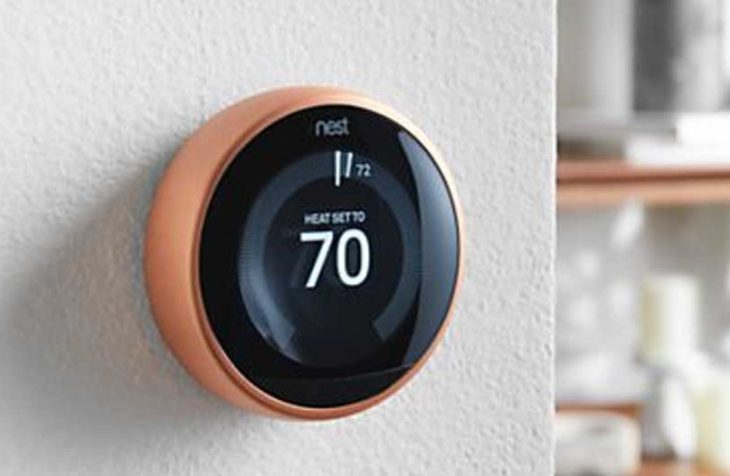
Nest Thermostat Troubleshooting Guide
This is a simple guide to help you know more about how to fix a variety of Nest thermostat problems.
Many errors can, in fact, be fixed by following the manufacturer’s manual and doing some minor adjustments to your Nest thermostat.
Nest Thermostats Error Codes
If you are having issues with Nest thermostat troubleshooting, the manufacturer offers a variety of online resources to help you understand better the error codes showing on your display and how you can tackle the issues.
Keep also in mind that, if you live in very cold areas, there may be some issues with the safety devices to do with the low-pressure valves installed on your AC. Among the most common type of error codes you could get related to this issue we find E3, E4, E23, E24, E73, E74, or E195 power error.
In cold weather, in fact, your HVAC (Heating and Cooling) system may stop sending power to your thermostat.
To fix this problem, you should seek professional help to install a common wire.
Rebooting a Nest thermostat
Before proceeding to more complex solutions, it is amazing how a simple reboot can fix most of the problems with your Nest thermostat.
Follow the steps below to reboot your thermostat.
Rebooting a Responsive Nest Thermostat
This is assuming of course that your Nest Thermostat is on and responsive.
Perform a reboot by following the steps below:
- Bring up the Nest Thermostat main menu by clicking on the thermostat unit itself.
- Using the silver scroll wheel, navigate to ‘Settings’ and select it by pushing down on the unit.
- Scroll all the way to the right and select ‘Reset’
- In the resulting menu, select ‘Restart’ and turn the scroll wheel till the dial reaches the far right.
- Finally, push on the unit to select ‘OK’
This process will cause the Nest Thermostat to restart, a process that takes only a few minutes, and hopefully, solve whatever issue it ha
If you’re unlucky enough to have your Nest Thermostat completely freeze upon you, don’t worry, there is an easy workaround to rebooting the device; Press down on the Nest Thermostat unit for around ten seconds and the screen will shut off. The Nest thermostat will then commence rebooting.
Nest recommends you only try this method if your Nest Thermostat unit is completely unresponsive as they liken this process to turning off a computer rather than shutting it down. Your thermostat could lose unsaved information.
It is a good maintenance policy to restart your thermostat once in a while even when it’s not acting up. This clears out any software gunk or bugs that you may not have noticed yet.
How to Connect Nest Thermostat to Wi-Fi
The great thing about Nest thermostats is that you can connect them to an app on your phone through Wi-Fi. Connecting the devices is very easy and will only take you a few minutes if you follow the steps below.
- Press the thermostat’s ring and open the “Quick View” menu.
- Select Settings.
- Click on Network. At this point, your Nest thermostat will scan all the available networks.
- Choose your home Wi-Fi network from the list and enter your password (if required).
Nest Keeps Going Offline
If your Nest keeps going offline and you feel like you need more information about the various error codes, then check out the troubleshooting Nest thermostat error codes.
It may be the case that you need to turn one of the thermostat’s wires into a C wire, in which case you will need to contact a Nest Pro.
One of the reasons why your thermostat goes offline probably has to do with some technical issues that prevent it from working correctly.
Once you have checked your Wi-Fi and are sure that it’s not the source of your problem, then you should consider checking the wires.
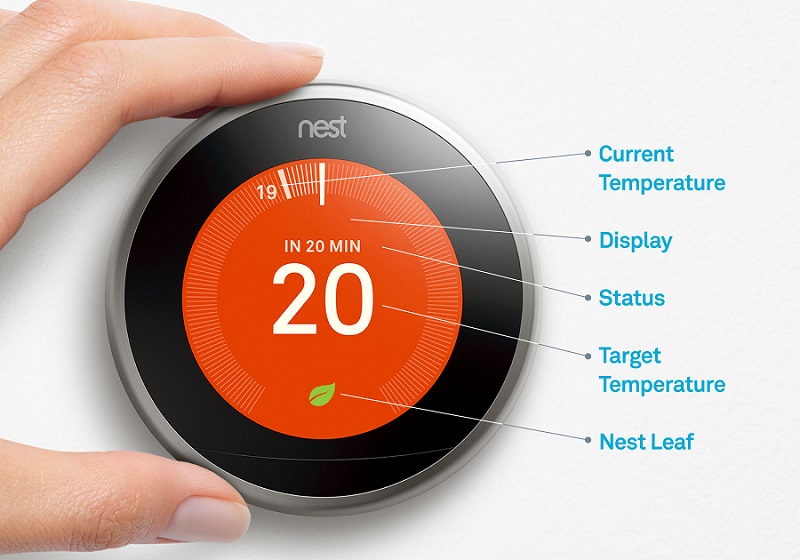
A very useful feature on your Nest thermostat is the fact that, if a problem with a wire is detected, the screen will display a diagram of your wiring, highlighting what’s likely to be the source of your error.
It’s also worth downloading the Nest app as any errors appearing on your thermostat’s screen will be reported on it as well.
Nest App Not Working
If you’re having problems regarding the Nest app not working, then try to uninstall and reinstall it.
It’s also a good idea to restart the Wi-Fi router and reconnect both your phone and Nest thermostat again.
At this point the app should work however if it doesn’t, you should check out the list of incompatible devices before asking for help from Nest thermostat support.
Your Nest Thermostat Has Low Battery
A very common mistake that everyone makes is forgetting to check the Nest thermostat’s batteries.
This is a very easy task, however, it’s advisable to check the manufacturer’s manual to make sure that you know exactly where the batteries are, in order to change them.
Hot to Check Battery Levels on a Nest Thermostat
But how do you check the battery level?
The easiest way to do so is by plugging the thermostat’s display into a micro USB cable.
If the thermostat’s battery is dead, then you will see a red blinking light. After a couple of minutes, the light will turn light green, and should see a message on your display saying, “please attach the display to its base”.
If, while the display is attached to its base, you see a red blinking light, then it means that the thermostat is charging but doesn’t have enough power to turn on.
When you see a green blinking light then you know that your thermostat is charged and ready to be used.
Thermostat Keeps Changing Temperatures
Among the other common issue that people experience with their thermostats is when the Thermostat Does Not Control Temperature. This has to do with many factors and one of the most common is dirt behind the thermostat. Follow the steps below to solve this problem.
- Turn the heating system’s power off and remove the thermostat’s cover.
- Brush off or vacuum the dust and dirt.
- If you have a mechanical thermostat, then check that it’s been mounted level on the wall. It should be mounted about 5 feet from the floor, where it can sense an air sample consistent with the actual room temperature. If your thermostat is mounted in a corner, near a window or a heat source consider relocating it to an area that won’t affect the room temperature sampling sensor.
If after following all the steps mentioned above your thermostat still doesn’t work, then you should consider contacting a technician for repairs.
Nest Thermostat Temperature Swings
If you notice major temperature swings in the room temperature, then your thermostat may need some small adjustments.
Follow the steps below to fix this problem in no time.
- Remove the thermostat’s cover and make sure that it’s mounted level on the wall. If your thermostat is not mounted level, then it won’t detect the room temperature properly.
- Look for the heat anticipator and adjust it. On most thermostats, you will see a small lever that moves along a scale marked as “longer” (not to be confused with the heat temperature level).
- Adjust that lever one mark closer to “longer” and wait a few hours for the thermostat to stabilize at the new setting.
If necessary, repeat the adjustment again.
Nest Thermostat Has a Black Screen and Won’t Turn On
If all your Nest Thermostat displays is a black screen and won’t turn on, try the steps below to troubleshoot the problem:
- Pull the silver ring of your thermostat gently away from the wall. The Nest Thermostat should pop off the base.
- Check the C terminal of the base to see if your Nest Thermostat Base has a C wire attached to it.
- If you have a C wire installed or have only two wires in your thermostat. Then you might need to check the fuse on your Heating and Cooling (HVAC) system.
- If your Nest Thermostat Base doesn’t have a C wire connected, then you’ll have to connect it using the steps outlined below.
How to Install a Nest Thermostat Using a C-Wire
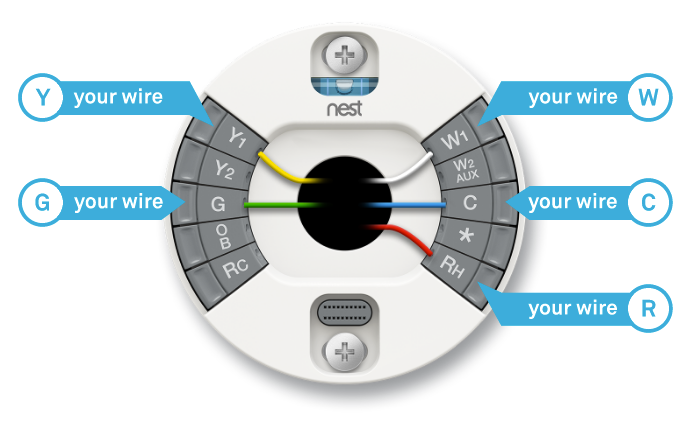
- SAFETY FIRST: Switch off all the power to your heating and cooling system at your circuit breaker.
- Take a picture of the Nest Thermostat Base wiring, should you need it later.
- Remove the Y1 wire from the base by pressing down on the button next to the connector while gently pulling on the wire.
- Wrap the now-exposed Y1 wire end in electrical tape to avoid it touching any wires.
- Replace the display back on the base and switch the power back on to see if your Nest Thermostat Unit is getting any power.
- If the Nest Thermostat turns on, you might see the following message; “The wiring to your equipment has changed.” If you do, simply select Continue > Continue > Continue then ‘Done’
Note that this method will only allow you to check that your Nest Thermostat Unit can actually boot and turn the heat back on. However, the Air Conditioning system requires a Y1 wire connection. Hopefully, this solves your issue if your Nest Thermostat won’t turn on.
Troubleshooting Common Nest Thermostat Error Codes
The Nest thermostat brings up different errors, either on the thermostat screen or on your mobile device app when it detects some errors on your device.
Below are some common Nest thermostat error codes, what they mean, and how to fix them.
The troubleshooting app over at the Nest website comes in quite handy when troubleshooting.
You will find a link to the Nest troubleshooting app at the very bottom.
Enter the error codes into the app to get step by step guide on how to fix them. (opens in a new tab).
There are two main types of errors.
1] E errors
These are critical errors that will not allow you to control your heating or cooling unless the error is fixed. You can either troubleshoot and fix the error or call in a Nest pro to help.
| Error code | Troubleshooting |
|---|---|
| E1 Common wire (“C” wire) needed. | You either have to update your Nest Thermostat firmware orrun a C-Wire. |
| E2, E22 & E72 No power wires detected.RcorRhwire required. | The Nest Thermostat isn’t physically detecting yourRcorRhwire or one isn’t attached. EitherRcorRhmust be connected for Nest Thermostat to work. |
| E3, E23 & E73 No power toRcwire detected. | The Nest Thermostat isn’t electrically detecting yourRcwire. |
| E4, E24 & E74 No power toRhwire detected. | The Nest Thermostat isn’t electrically detecting yourRhwire. |
| E5, E25 & E75 No heating or cooling detected.W1orY1wire is required. | The Nest Thermostat isn’t physically detecting your aW1(heating) orY1(cooling) wire. At least one terminal is needed for all systems compatible with the Nest. |
| E6 Too many wires detected. Please remove at least one ofO/B,W1,Y1or AUX. | The Nest Thermostat doesn’t support the configuration of wires you’ve attached. |
| E7, E27 & E77 Y1wire not detected. A heat pump requires aY1wire. | Your Nest Thermostat is physically detecting a wire in theO/Bconnector, which means that you have a heat pump system. Heat pumps require aY1wire to be connected. |
| E8, E28 & E78 Additional wire(s) required.W2/AUXdetected by itself. | Your Nest Thermostat is physically detecting a wire in theW2/AUXconnector. Supported configurations that use this connector also include aW1(heating) wire or anO/B+Y1wire. |
| E9, E29 & E79 No power toCwire detected. | Your Nest Thermostat is physically detecting a wire in theC(common) connector but isn’t detecting any power to it. |
| E10, E30 & E80 No power toY1wire detected. | Your Nest Thermostat is physically detecting a wire in theY1(cooling) connector but isn’t detecting any power to it. |
| E11 Heat pump wireO/Bdetected. No heat pump system present. | Your Nest Thermostat is physically detecting a wire in theO/B(heat pump) connector but isn’t detecting any power to it. You may need to update your Nest Thermostat’s software. |
| E12, E32 & E82 No power toW1wire detected. | Your Nest Thermostat is physically detecting a wire in theW1(heating) connector but isn’t detecting any power to it. |
| E13, E33 & E83 A heat pump can have at most one auxiliary heat wire. | Your Nest Thermostat was previously setup as a single fuel system with auxiliary heat, but it’s detecting bothW1andW2/AUXwires. Single fuel heat pump systems support a wire in eitherW1orW2/AUXbut not in both at the same time. |
| E14, E34 & E84 Dual fuel requires an alternate heat wire. | Your Nest Thermostat was previously set up as a dual fuel system, but it’s not detecting aW1,W2/AUXor(W3). One of these wires is required in order to have alternate heat. |
| E35, E85 Dual fuel can have at most two alternate heat wires. | Your Nest Thermostat was set up as a dual fuel system, but theW1,W2/AUXand (W3) wires are configured as alternate heat wires. |
| E36, E86 A heat pump can have at most one auxiliary heat wire. | Your Nest Thermostat was set up as a single fuel system with auxiliary heat, but it’s detectingW1,W2/AUXand (W3) wires. Single fuel heat pump systems support a wire in only one of these connectors. |
| E37, E87 A heat pump can have at most one auxiliary heat wire. | Your Nest Thermostat was previously set up as a single fuel system with auxiliary heat, but it’s detectingW1and (W3) wires. Single fuel heat pump systems support a wire in eitherW1or (W3) but not in both at the same time. |
| E38, E88 A heat pump can have at most one auxiliary heat wire. | Your Nest Thermostat was previously set up as a single fuel system with auxiliary heat, but it’s detectingW2/AUXand (W3) wires. Single fuel heat pump systems support a wire in eitherW2/AUXor (W3) but not in both at the same time. |
| E39, E89 Y2wire withoutY1wire. | Your Nest Thermostat is physically detecting aY2wire but not aY1wire. Both wires are required for 2 stage conventional cooling systems or 2 stage heat pumps. |
| E40, E90 W3wire withoutW2/AUXwire. | Your Nest Thermostat is physically detecting a (W3) wire but not aW2/AUXwire. Both wires are required for 3 stage conventional heating systems. |
| E41, E91 E wire withoutO/Bwire. | Your Nest Thermostat is physically detecting a (E) wire but not anO/Bwire.O/Bis a heat pump wire and the Nest Thermostat only supports the use of emergency heat with heat pump systems. |
| E42, E43, E44, E45, E46, E47, E48, E49, E50, E51, E92, E93, E94, E95, E96, E97, E98, E99, E100, E101 Please contact Nest support to help troubleshoot this error. | Your Nest Thermostat either has wires that aren’t fully inserted into the connectors or has tripped an internal fuse. |
| E52, E53, E54, E55, E56, E57, E58, E102, E103, E104, E105, E106, E107, E108 The Nest Thermostat has an overcurrent error. | Your Nest Thermostat may be wired incorrectly, or your system may be incompatible. |
| E109 G2detected.G1wire is also required. | Your Nest Thermostat is physically detecting aG2(fan) wire in theY2connector, but it’s not detecting a wire in theGconnector. Both wires are required for amulti-speed fan. |
| E110 G2wire detected. RemoveW2/AUXwire. | Your Nest Thermostat is physically detecting a wire in the W1connector, a wire in the AUX/W2connector, and aG2(fan) wire in theY2connector. This indicates you have more than one stage of heat and more than one fan speed. The Nest Thermostat does not support multiple stages of heat and multiple fan speeds at the same time. Contact aNest Proinstaller if you need more help. |
| E111 G2wire detected. RemoveEwire. | Your Nest Thermostat has detected aG2(fan) wire in theY2connector, and an emergency heat wire in the connector. The Nest Thermostat doesn’t support amulti-speed fanand emergency heat together. Contact aNest Proinstaller if you need more help. |
| E112 Gwire detected.G1andG2also required. | Your Nest Thermostat is physically detecting aG3(fan) wire in the connector, but it isn’t detecting aG2(fan) wire in theY2connector or a wire in theGconnector. All three wires are required for athree speed fan. Contact aNest Proinstaller if you need more help. |
| E113 G2andO/Bwire conflict. | Your Nest Thermostat has detected aG2(fan) wire in theY2connector, and a wire in theO/Bconnector. This wiring indicates amulti-speed fanand a heat pump. The Nest Thermostat doesn’t support this kind of system. Contact aNest Proinstaller if you need more help. |
2] N errors
N errors aren’t that critical and only disable or affect some features of your thermostat. Once again, you can use the error definition to troubleshoot and fix the thermostat or call in a Nest pro to do it for you.
| Error code | Troubleshooting |
|---|---|
| N1, N21 & N71 Power wire Rc detected. Not connected to equipment. | Your Nest Thermostat isn't electrically detecting your Rcwire, but one is connected to the Nest Thermostat base |
| N2, N22 & N72 Power wire Rh detected. Not connected to equipment. | Your Nest Thermostat isn't electrically detecting your Rhwire, but one is connected to the Nest Thermostat base. |
| N3, N23 & N73 No power to W1 wire detected. | Your Nest Thermostat isn't electrically detecting your W1wire, but one is connected to the Nest Thermostat base. |
| N4, N24 & N74 No power to Y1 wire detected. | Your Nest Thermostat isn't electrically detecting your Y1wire, but one is connected to the Nest Thermostat base. |
| N5, N25 & N75 No power to W2/AUX wire detected. | Your Nest Thermostat isn't electrically detecting your W2/AUX wire, but one is connected to the Nest Thermostat base. |
| N6, N26 & N76 No power to G wire detected. | Your Nest Thermostat isn't electrically detecting your Gwire, but one is connected to the Nest Thermostat base. |
| N7, N27 & N77 No power to O/B wire detected. | Your Nest Thermostat isn't electrically detecting your O/Bwire, but one is connected to the Nest Thermostat base. |
| N28 & N78 No power to Y2 wire detected. | Your Nest Thermostat isn't electrically detecting your Y2wire, but one is connected to the Nest Thermostat base. |
| N29 & N79 No power to wire detected. | Your Nest Thermostat isn't electrically detecting your wire, but one is connected to the Nest Thermostat base. |
W errors
These are errors related to wireless connectivity. Your thermostat will still work offline but you will have issues accessing it from the Nest app or via any application that taps into your Nest account
| Error code | Troubleshooting |
|---|---|
| W1 The Nest Thermostat can't continue to connect to your Wi-Fi network. | Your Wi-Fi access point may not fully support a Wi-Fi standard known as power saving mode. |
| W2 Failed to connect. | Your Wi-Fi access point may have security settings enabled that prevent your Nest Thermostat from connecting. |
| W3 Failed to connect. | Your Wi-Fi access point is not providing a network IP address to your Nest Thermostat. |
| W4 Failed to connect. | The Nest Thermostat is connected to your wireless network but not to the Internet. |
Once again, if following these steps didn’t work to fix your smart thermostat then you might need professional advice on whether to get your product fixed or replace it with a new one.